How to configure VSCode with Clang/LLVM compiler for C++ on MacOS
November 11, 2021
How to configure VSCode with Clang/LLVM compiler for C++ on MacOS:
In this post, I will show you how to configure Visual studio code with CLang or LLVM compiler and how to run a simple C++ program. With this approach, you can easily change the C++ compiler version to build your C++ files on MacOS.
Step 1: Install Clang:
Open one terminal window and run the below command to check if clang is installed or not:
clang --versionIf it is installed, it will show its version something as like below:
Apple clang version 12.0.5 (clang-1205.0.22.9)
Target: arm64-apple-darwin20.0.0
Thread model: posix
InstalledDir: /Library/Developer/CommandLineTools/usr/bin
If it is not installed, run the below command to install the command line developer tools:
xcode-select --installStep 2: Install C++ extension for VSCode:
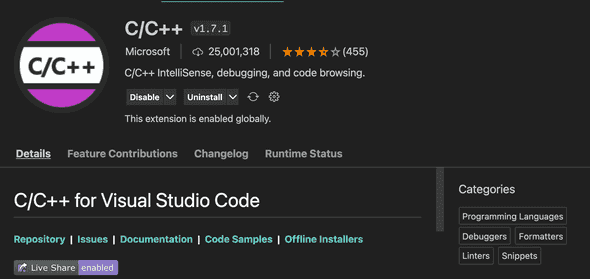
C++ extension by Microsoft is the recommended extension to work with C++ on VSCode. Go to the extension tab on VSCode and search for C/C++ extension and install that.
Step 3: Open the folder in VSCode:
Open the folder with the cpp file on VSCode. If you have multiple C++ files in different folders, you need to open the root folder. VSCode will create a config file at the root of the project directory. So, make sure to choose the root level of the project.
Step 4: Create a tasks.json file:
tasks.json is a configuration file for VSCode. It is created inside a .vscode folder at the root of the project.
Open your C++ file. This is an important step because we will ask VSCode to create the tasks.json file in the next step.
a)
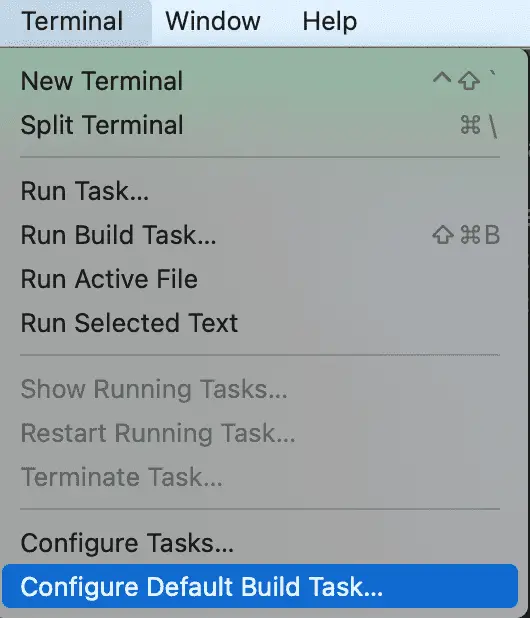
Click on Terminal from the menu and click on Configure Default Build Task.
b)
Select C/C++ clang++ build active file. It will create one tasks.json file in the .vscode folder and open it.
Step 5: Edit tasks.json:
By default, tasks.json is not created with a configurable compiler options. Update it as like below:
{
    "tasks": [
        {
            "type": "cppbuild",
            "label": "C/C++: clang++ build active file",
            "command": "/usr/bin/clang++",
            "args": [
                "-std=c++17",
                "-stdlib=libc++",
                "-g",
                "${file}",
                "-o",
                "${fileDirname}/${fileBasenameNoExtension}"
            ],
            "options": {
                "cwd": "${fileDirname}"
            },
            "problemMatcher": [
                "$gcc"
            ],
            "group": {
                "kind": "build",
                "isDefault": true
            },
            "detail": "compiler: /usr/bin/clang++"
        }
    ]
}
We have changed to use C++ 17 compiler inside args.
- args is an array of command line arguments those will be passed to clang++.
- command is the command to run.
- cwd is the directory your C++ code is.
- It will compile the file and create the compiled file with the same name fileBasenameNoExtension in the same folder.
- label is the name to show in the tasks list. It can be anything.
- isDefault is set to true to ensure that it will run on ⇧⌘B.
Step 6: Build the code:
Save the changes you made in tasks.json and open the .cpp file in an editor. Before you build the file.
It is important to have the file open. For example, if you have two files, it will build only the file that is currently open or the one which is currently in an active tab.
a)
You can build it in two ways.
- Press ⇧⌘B to build it. Since we have assigned true to isDefault in the tasks.json file, it will start the build.
- It will open the integrated terminal of VSCode and show the build process.
- Or, use Terminal -> Run Build Task. Both works same.
b)
Once the build is done, it will show a message on the terminal.
....
....
Build finished successfully.

Terminal will be reused by tasks, press any key to close it.
Click on any key to close it and open another terminal.
Step 7: Run the program:
The build process creates two files in the same folder. For example, if example.cpp is the program file, it will two more files:
example
example.dSYM
Open one terminal and use ./example to execute the program.

